

This is a brief introduction to the Arduino, MIDI, and how the Arduino can be used to communicate musical messages. This guide is not a tutorial. This guide provides a quick, concise explanation of these technologies and links to some of the best resources to get started.
What’s all this Arduino stuff anyway?
 An Arduino is a microcontroller on a circuit board populated with other useful electronic parts like a USB programming port, battery connector, little lights that blink, pinholes for digital inputs/outputs (1/0 electronic switches), and 6 analog to digital converters (ADCs) that convert a voltage to a number (0 to 1023, more voltage equals higher number). The UNO is the classic Arduino available through Arduino.cc or other retailers. See here for all things Arduino, including a download of the free programming editor that works with PC, MAC, and Linux operating systems.
What’s all this MIDI stuff anyway?

MIDI is an acronym for “Musical Instrument Digital Interface.” Developed in the early 1980s, MIDI was designed to be an open, shared protocol for transmitting musical information from one synthesizer to another. The MIDI specification includes everything from simple note on messages like “play this note this loudly now” to “play this note 53.24 cents lower than concert pitch with an attack of 34 using a clarinet sample modulated with a lowpass filter resonance set to 47.” Messages can be sent in real-time or recorded and saved to a MIDI file to be played later. In 1983, MIDI was to synthesized sound what html later became to the Internet. Although the MIDI specification has had its critics, it is still omnipresent in hardware and software synthesis.
Arduino and MIDI
The Arduino is an ideal device to gather human input and convert that input into MIDI messages. With just a standard Arduino UNO, a breadboard, and a handful of potentiometers, switches, and wires, you can build your own MIDI controller.
Understandably, most people might ask: With the cost of hardware MIDI controllers falling fast, why not just buy one of those? Most people would ask: Why not just buy an iPad and download some apps? As e.e. cummings observed, “…it’s no use trying to pretend that mostpeople and ourselves are alike. Mostpeople have less in common with ourselves than the squarerootofminusone” (introduction to Collected Poems, 1938).
The Arduino is an ideal device to drive midi messaging. Fortunately, neither the Arduino nor MIDI are new, so you don’t have to be the first penguin to jump in the water. There are two well-known, fully-documented, reliable ways to set up an Arduino to drive MIDI: CLASSIC and HAIRLESS.
CLASSIC

The CLASSIC method uses a traditional MIDI 5-pin jack. The Arduino website has a tutorial with a simple schematic and program that will work. Tom Igoe with the ITP Physical Computing program at NYU has a much more detailed tutorial here. These examples will work.
But there are two common problems with the CLASSIC method. First, if you use the TX pin from the Arduino.cc circuit for programming, you may encounter trouble sending a new program to the Arduino. That TX line is also used for loading programs to the Arduino and having it connected to a 5-pin MIDI device can cause the new Arduino program not to load. You’ll get an error message in the software log. If this happens, simply disconnect the TX wire from the 5-pin jack when loading a new program to the Arduino and reconnect it once the program is loaded.
The second problem concerns the wiring of the 5-pin jack. When you look at a schematic, are you looking at the jack from the front or the back? Yes… and that’s the problem. The Internet is littered with incorrect schematics, mislabeled pin numbers, and other shoddy documentation. Use Google Images to view a hodgepodge of 5-pin MIDI output circuits and diagrams. You might as well be looking at a Picasso painting through a kaleidoscope after a long night at the hookah bar.
Look again at the tutorial on the Arduino website. The MIDI jack in the schematic is shown from the front of the jack – the open hole side where you would actually plug in a cable. The wire connections you need to make are always on the back side of the cable. Using the same red, black, and blue wire colors in the Arduino schematic, here is what your wiring should actually look like for a couple of common 5-pin jacks. Below these examples is the exact circuit shown on the Arduino.cc site, same color wires, same 220 ohm resistors, same connections. The only difference is that I used a breadboard to position the two resistors. I used the exact Arduino code/program posted at the tutorial. These examples work.


One benefit of being able to run in CLASSIC mode is that, once programmed, the Arduino doesn’t need a computer. You can run the Arduino using a 9-volt battery and connect it to countless old and new synthesizer soundmakers with a 5-pin MIDI jack. That can be a major advantage. But the other method has advantages, too.
HAIRLESS
Why hairless? Because that’s what Angus Gratton called it: The Hairless Midi to Serial Bridge. Sometimes, you need to shave a yak… without, of course, hurting the yak.
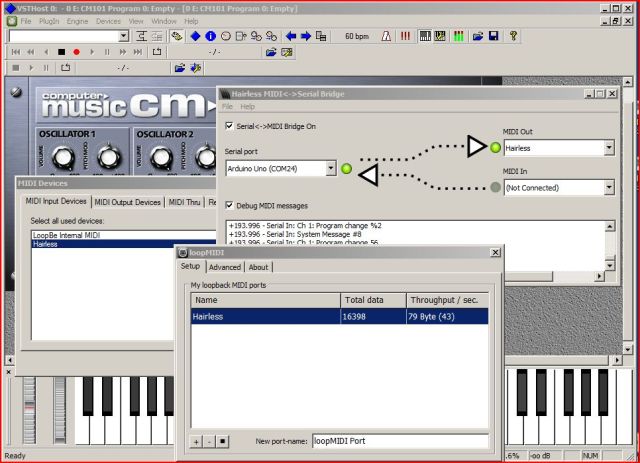
The HAIRLESS approach uses the standard USB cable connection that you use to program your Arduino from the computer. It takes the MIDI messages from the Arduino and creates a serial bridge (virtual plumbing pipe) to send the data from the Arduino into the computer and treat the data like any MIDI message coming into the computer. There are directions for a PC and MAC setup on the HAIRLESS webpage.
I have a PC and prefer to use the HAIRLESS bridge with LoopMIDI to send MIDI messages to VSTHost. LoopMIDI was developed by Tobias Erichsen and is free for non-commercial use. It simplifies the routing of any internal MIDI messages sent through your computer. VSTHost was designed by Hermann Seib for hosting VST synths, a very common format for software synths. VSTHost can be used to support a wide range of VST instruments, including synth and sample player VSTs. It can be set up as a standalone application for one specific VST — click and run.
But VSTHost is just one option. There are many other programs that support MIDI for playing software synthesizers, including some very advanced no-cost solutions like the SFZ Player or Presonus’s Studio One Prime. Or, you could use HAIRLESS and LoopMIDI to route your Arduino MIDI messages to any MIDI soundmaker connected to your computer.
That is the main advantage of HAIRLESS. The CLASSIC method allows you to connect Arduino to MIDI without a computer and sometimes that is important, but HAIRLESS will connect you to anything that accepts MIDI messages through your computer and these days that is a much larger collection of software synthesis technologies.
The most important thing to remember with HAIRLESS is that the MIDI message send rate is different than standard MIDI. Standard MIDI uses a serial rate of 31,250 bps, but HAIRLESS uses 115,200bps. Just remember that if your Arduino code has a line like Serial.begin(31250), you will need to change that to Serial.begin(115200). Also note that, as with the CLASSIC method, you will need to disconnect HAIRLESS from the Arduino to send a new program to the device. All of this is very well-documented in greater detail on the HAIRLESS homepage.
Parts and Programs
For both the CLASSIC and HAIRLESS implementations, you will want to experiment with different electronic parts and write increasingly powerful programs. People have spent years learning electronics and years learning programming and each is a discipline of its own. But if you are new to all of this, the breadth of information about parts and programming can be overwhelming. Here are two simple popular guides to get started understanding how programming works and the kinds of circuits you may want to build.
Jody Culkin has an excellent comic that introduces the Arduino, software, and circuits. Very highly recommended.
The Arduino.cc website includes the entire programming reference, but the basic commands required to use the language are well-defined by Brian Evans in his Arduino Notebook.
But Wait, There’s More
Both the Arduino.cc website and Tom Igoe’s tutorial demonstrate basic midi commands for sending MIDI data. There is a whole other world that involves receiving and processing MIDI messages.

To input midi messages in CLASSIC mode, you need to set up a midi input circuit with an optoisolator/optocoupler, a chip that takes the incoming midi signal and turns it into an electronic message the microcontroller can process. The original electrical specification for MIDI IN (and the official OUT) is here. Newer designs use a different optoisolator/optocoupler such as the 6N137, 6N138, and others. The chips cost only a few dollars at most, but each chip has its own peculiarities in terms of setting up an appropriate circuit. You can Google a circuit and that may help, but it is better to read the original documentation and carefully build your own circuit, matching your optoisolator/ optocoupler pin-for-functional pin to the original specification using the PDF datasheet for your specific part. Once the circuit is set up, you can use the Arduino MIDI Library to parse incoming MIDI data into meaningful midi messages. The library has callback functionality like many programming languages that handle streaming data.
Or, you can just use HAIRLESS which can send and receive MIDI message to the Arduino using the same Arduino MIDI library to parse the messages.
Next Steps: STOP
Once you have a setup you are comfortable using, you should keep it for a while. If you can, resist the urge to tweak, twiddle, fiddle, and futz with what works. There will be a faster, smaller, more powerful controller and a new MIDI library or a better driver or interface or a single, insanely cheap device that promises to replace everything that ever came before it and do ten times more and that’s wonderful. Let someone else debug the latest software release or find the critical error in the schematic.

Don’t Panic. Lock Your Panel and Turn the Tempo Down
Once you have your Arduino/MIDI build all set up, that’s a good time to stop and remember why you went to all of this trouble in the first place. No one I know has ever thought: “I would like to spend unpaid hours of my life ordering electronic parts or reading programming manuals just to pass the time.”
There was something you intended to do with all of this. I don’t necessarily know what it was, but you do. That thing you wanted to do? You should do that.
WEI 12/31/2015

You must be logged in to post a comment.